The Exploratorium

...Chocolate       Activity Continued

Question of Temperature

Step 1.
Fill the saucepan 1/3 of the way with water and heat to almost a boil. You want the water to be steaming hot, but don't let it boil.

Step 2.
Get out your couverture. If it is not already cut up, cut it into small pieces of equal size.

Chocolate in the bowl Step 3.
Put 2/3 of the couverture into your steel bowl and place the bowl on top of the sauce pan. It's important to make sure that water never directly touches the bottom of the bowl. The chocolate should slowly begin to melt. Try not to disturb the chocolate during this process. A few stirs with a rubber spatula near the end of the process should help mix the melted chocolate.

Checking the Temperature Step 4.
As the couverture melts, monitor the temperature with your thermometer. The melting temperature of the chocolate will vary depending on the manufacturer, but should not exceed 115 degrees. As soon as the chocolate has melted, remove the bowl from the saucepan. Use a towel to wipe away moisture from the bottom of the bowl. This will prevent any water from finding its way into the bowl. Water will separate the chocolate and can ruin the batch.

Step 5.
Place the bowl on a table and add 1/3 of your remaining chocolate to the bowl. Stir until the introduced chocolate completely melts. Take another third and repeat the process. Monitor the temperature of the chocolate as you mix it. You should notice the temperature drop to around 100 degrees, and then closer to 90 degrees. Take the remaining third of chocolate and place it in the bowl.

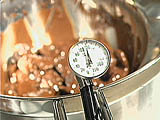
Using the rubber spatula, mix the chocolate until all of it is completely melted. If the chocolate is not fluid enough, place the bowl over the hot water for a few seconds and stir. Then remove from the heat and wipe the moisture off the bottom of the bowl.

You're now ready to use the melted chocolate to create candies (see the sidebar for some simple procedures). Check the temperature one more time. If you used dark chocolate, the temperature should be between 85 and 90 degrees. If you used white or milk chocolate it should be around 85 or 86 degrees.

Chocolate-Dipped
Fruits and Nuts

The process for creating chocolate-covered fruits and nuts is pretty simple. Cut the fruit into small sections and put aside. Make sure the fruit is clean and dry (remember, water will cause the chocolate to separate). Take your cut fruits and nuts and dip or dunk them in the chocolate. Using a candy fork (or a regular fork), pull them out and place them on a lined pan. Refrigerate for 5 to 10 minutes and then remove them from the pan. They're ready to eat.

Cool Chocolate Bowls
For this procedure, you'll need balloons and a hat pin. The balloons will help you make cup-shaped chocolate "bowls," and you'll use the hat pin to let the air out of the balloon. (Please be very careful with the hat pin--it would be very dangerous if it fell into the chocolate.)

Before you begin the tempering process, you'll need to blow up a number of small balloons to about the size of coffee cup. Take your blown-up balloons and dip them halfway into the melted chocolate. Make sure the "tied" side is up. Swirl the balloon gently around to produce an even coat. Then lift the balloon slowly to let some of the excess chocolate drip back into the bowl.

Place the balloon on a lined cookie sheet. The chocolate should start to settle and the balloon will stand up on the pan. Repeat the process for as many cups as you'd like to make. Then place the pan into the refrigerator for 5 to 8 minutes. When you remove the pan from the refrigerator, the chocolate surrounding the balloons should be hard.

Chocolate bowls

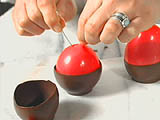
Use the hat pin to carefully poke a small hole at the top of the balloon, near the knot. [Click here to see a Quicktime movie of this procedure (625k) ] As the balloon deflates, gently pull it away from the chocolate cups. When you're done, you can fill the cups with fruit (berries work well) and whipped cream, cold pudding, ice cream, or chocolate mousse. Be creative, and enjoy!

NAVIGATION BAR

© Exploratorium