Time
bullet 30-60 minutes

Preparation
bullet Prepare clay beam molds (see inset).
bullet Set out materials.

Groupings
bullet Pairs or table groups for demonstration

Materials
(per pair or group)
bullet 2 pounds or more of plasticene (modeling clay)
bullet Butter knife, steel rule, wire, or dental floss for cutting clay
bullet Ruler
bullet Paper to work on

Teacher Tips
bullet Plasticene is an oil-based clay. It leaves an oily residue on surfaces. Work on paper and/or be prepared to clean desks with soap or other grease remover.
bullet If you have students do this in pairs, try setting it up as a center where a subgroup of your class can work while the rest works on something else. This saves on the number of beam molds that you need to make and the total amount of plasticene that you need.


Clay Beams and Columns

Page: 1 | 2 | 3 | 4 | 5

Context

The central idea of this activity is that when you scale up proportionally (i.e., keep things the same shape but change the size) weight increases faster than strength. These beams afford a dramatic demonstration of that fact, and the activity therefore works quite well as a demonstration. It can also extend into inquiry, by using the proportional clay beams formed in the beam molds as the raw material for investigation.


What Is It

Before beginning this activity, you must build at least one set of beam molds as described in the inset.
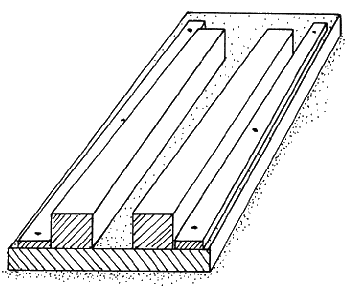

Building a Set of Beam Molds
claybeams drawing
Beam molds can be built with scrap lumber and wooden moldings, or with materials purchased from a lumber yard. For a set, you will build one mold for 1/4 -inch-by- 1/4 -inch cross-section beams (small mold) and one mold for 1-inch-by-1-inch cross-section beams (large mold). Materials for one set are listed on the next page.

  ©2000 The Exploratorium