Click
to
enlarge.
© Amy Snyder
|

|
Click
to
enlarge.
© Quincy Moore
|
|
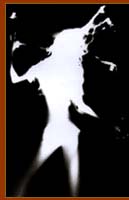
 ou
don't have to have a camera to make a photographic
image. With a light source, an object to block the
light, and light-sensitive paper, you can create wonderful
silhouette-like images known as photograms. In this
case, the light-blocking object will be you, as you
create a self-portrait photogram.
ou
don't have to have a camera to make a photographic
image. With a light source, an object to block the
light, and light-sensitive paper, you can create wonderful
silhouette-like images known as photograms. In this
case, the light-blocking object will be you, as you
create a self-portrait photogram.
For
the past two years, high school students in a Basic
Photography course (co-taught by the author and Katya
Kallsen at the California College of Arts and Crafts
Precollege program) have been making exquisite, mural-sized
photograms of themselves. During the class, students
choose a pose and attire that expresses something
about who they are. The results range from poetic
to abstract to humorous—but each student captures
something unique, creating a very personal self-portrait.
Here
are two different ways to make a photogram, one using
regular photographic paper and processing, and the
other using special "sun-print" paper that
processes in plain water.

Materials
-
photographic
paper (available from photo supply stores in many
different sizes—11" x 14," 16"
x 20," and 20" x 24"—sold in
packets of ten sheets with light-tight envelope
included. (To make photograms of a large group,
you can buy a roll of photographic paper and cut
it to any size you like.)
-
pushpins
-
a
safelight (a red "party" light bulb, or
a regular light bulb painted with dark red nail
polish will do; you can also buy safelight bulbs
at a photo supply store)
-
a
flash, and a friend to pop the flash (alternative:
a bare light bulb in a socket or a clamp-on light;
flick on for one or two seconds, then off again)
-
a
room that you can make completely dark (best is
a big closet or a room with no windows)
To
Do and Notice
-
Turn
on your safelight and darken the room. Remember
to block light leaks from under doors and around
any windows (use towels or blankets for large leaks,
tape for small ones)
-
Pin
a sheet of photographic paper to a wall.
-
Set
up a flash on the lowest power setting about ten
to twelve feet from the paper. (Alternative: put
a floor lamp with the bare bulb about ten to twelve
feet away)
-
Stand
in front of the paper and try out various poses.
When you've decided on a pose, stand as close as
you can to the paper and have your friend pop the
flash (or flick the light bulb on and off for about
two seconds).
-
Immediately
put the paper into the light-tight envelope.
-
Bring
your photogram to a photo lab for processing.
For
advanced photographers:
If you have access to a darkroom, or a room with no
windows such as a walk-in closet, you can develop
your photogram yourself using plastic trays and standard
developer, stop, and fixer for black-and-white photography.
Just follow the directions that come with the chemicals.
|
 Click
to enlarge.
Click
to enlarge.
© Katherine Bauer
|
|
Click
to
enlarge.
© Amy Snyder
|
|